22 May The Road to Maker Faire: How to Launch a rocket!
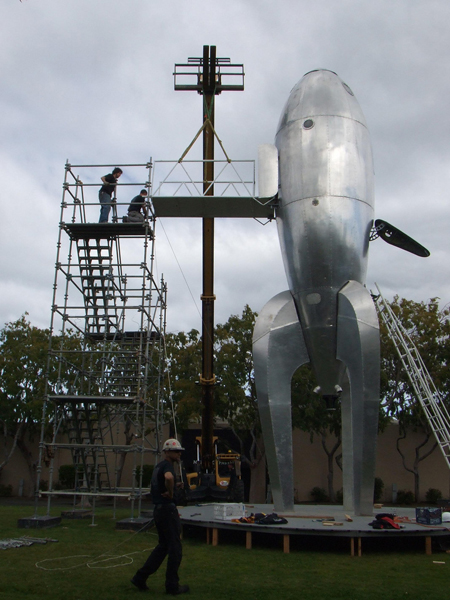
The Raygun Gothic Rocketship has been successfully installed and is “standing by,” ready for the 2010 Makers Faire weekend. Our gantry tower has been erected and the explosive bolts on the escape hatch are armed!
We are all systems go…!
The RGR is more than just a shiny outer hull… and so we wanted to give you a brief glimpse of what you’ll find inside. To begin, here’s a post by one of the lead artists on the RGR project, David Shulman, talking about our deployable on-board rocket (probe)launcher.
SeanO
How to Launch a Rocket… from a Raygun Gothic Rocketship
by David Shulman
Every rocketship needs a rocket launcher, right?! In case you want to launch a probe? Or need to fire a space torpedo? Since my friends and I were already building a rocketship, I decided that we needed to build a rocket launcher too. The fact that I’ve never built a kinetic mechanism before should not be a deterrent, right?! I thought long and hard about what qualities it should have. Something that can be activated from inside; a launch platform that deploys from the side of the ship; a clear blast shield that allows you to witness the launch, and a mirrored outer hull cover that lets you follow the ascent. My friend John Hollis and I started to scheme.
The first iteration was a temporary success; driven by a linear actuator following a curved path and operating a lever, it extended an aluminum tray out of the body of the main ship, and electrically fired an Estes rocket. I said it was a temporary success, because after five days of use, it failed (granted, it was Burningman) – the actuator ceased to function, although the firing mechanism still worked. (We could, and therefore did, continue to launch rockets for several more days.)
We got back to the shop, only to discover that the actuator was fine – a simple toggle switch had suffered an internal failure. No matter – the Mark II was destined to be better, anyway. We planned to swap the linear actuator for a rack and pinion gear, as it would reduce the space needed, which on a spaceship is always helpful.
The Mark II.a (reployed at Yuri’s Night, at NASA Ames Research Center) worked OK, but we found that the rack and pinion actually needed to be perfectly aligned and spaced to work smoothly. Who would’ve thought?! With the Mark II.b (this weekend’s Maker Faire), we added limit switches, to stop the motor when the tray hit the end of its travel, to prevent burn out.
In the shop, it all worked – we tested it thoroughly, and found no problems after a dozen cycles. Imagine my consternation when, trying to test-launch a probe to measure wind direction on the midway yesterday. — it didn’t work! I toggled “extend” and it would not go. But when I tried “retract,” I had no problem?
I could not figure it out. Everything checked out, there were no shorts, (other than the ones I inadvertently caused ), all the switches were working, but I could not find the problem.
Finally, I thought to check the default on the limit switches. Sure enough, the outer limit switch was wired backwards! I have no idea how we tested successfully in the shop – but at 5:30 PM on Wednesday of set-up week – I had it! It went something like this:
- Estes Alpha II, with an A6-3 engine, racked and ready for launch.
- Deploy the launch assembly.
- Arm the ignition system.
- Ask a passerby to tell me (from outside the ship) which direction my probe goes.
- 3, 2, 1…
- Launch!
And the results?
The good news: a successful test launch!
The bad news.: an offering to the rocket gods.
(If you find the lost rocket, or any other we might launch over the weekend, bring it back to us, and come straight to the head of the line! Or, if you can explain what allowed us to test successfully in the shop, then find a problem in the field, you get to launch one!)


Sorry, the comment form is closed at this time.